| |
Suzuki tried to make these
l000cc twins easy to ride for all types of riders and placed some restrictions
on the ignition and the air intake system. On this page we tackle the
de-restriction of the air intake system.
The mod comes in two phases (coming from my project management days), "Phase
One" being the flapper removal. This phase is imperative to peak performance. In
my eyes this is a must! The second phase, "Phase Two" being the base plate
cutting is less important and not necessary.
Phase One
Preparations:
First take off your drivers seat and then remove the steering damper. Then prop
up your tank to expose the top of the airbox lid.
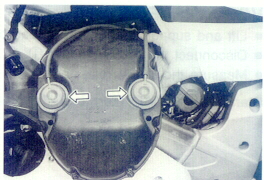
The flappers close off the air
intake at low RPMs in 1st and 2nd so that the bike is not so jumpy. Really this
robs performance. Remove the flaps and the actuators and adhere a metal or
plastic disc to cover and seal the left over hole as shown below.
Once this is done you should remove all the supporting vacuum lines. If you are
uncomfortable with this step you can go ahead and securely plug the flapper
(actuator) vacuum lines.
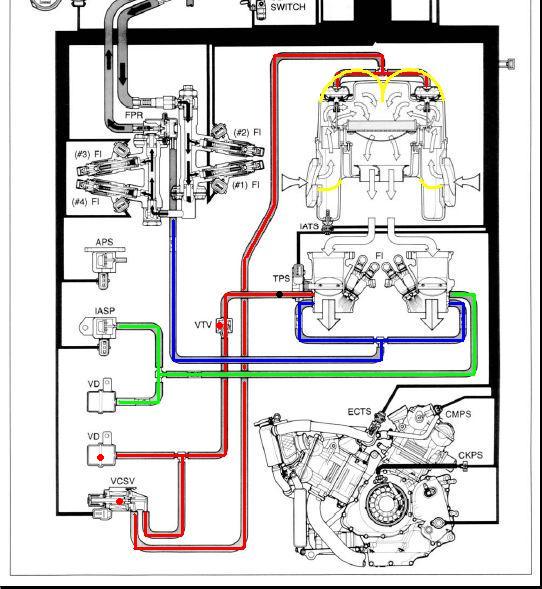
In the above diagram of the vacuum system the lines in red and the components
with a red dot on them are now useless and can be removed. You will want to plug
the line off the throttle body as denoted by the black dot on the red line. Also
tape the VCSV electrical connection. Yes it is OK to remove the VCSV, VD and,
VTV can all be removed.
Phase Two
BEFORE YOU CUT: This mod is kind of controversial. There are a lot of factors
when it comes to aerodynamics of the inside of the airbox. Cutting the base
plate does open up a bigger airway but may create more turbulence inside the
airbox that can actually RESTRICT air flow.
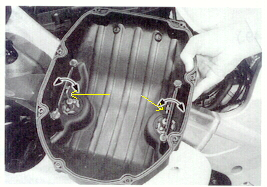
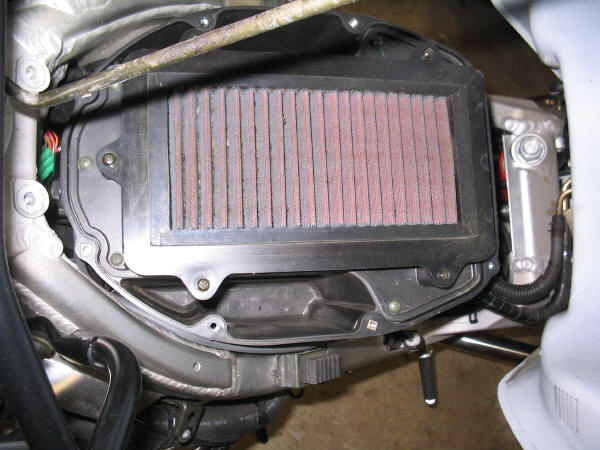
From here, with the airbox lid removed and modded you should be looking at the
air filter:

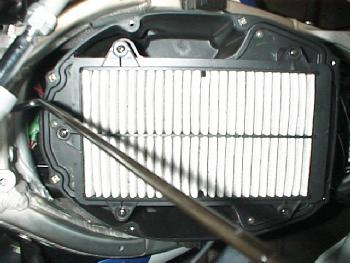
Remove the screws that are circled in the pic above and set the filter aside.
CAUTION: BY REMOVING THIS FILTER YOU ARE OPENING THE
ENGINE. ANY OBJECT DROPPED INTO THE OPENING CAN SEVERELY SHORTEN THE LIFESPAN OF
YOUR ENGINE! Once removed you should see:

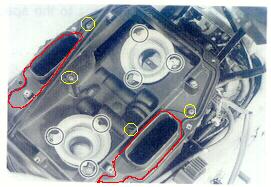
Remove the screws circled in the pic above. CAUTION: UNDER THE THROTTLE BODY
FLUTES (the metal holes in the pic) ARE "O" RINGS. CAREFUL NOT TO DAMAGE OR LOSE
THEM! In this step you are removing the base plate that we are going to
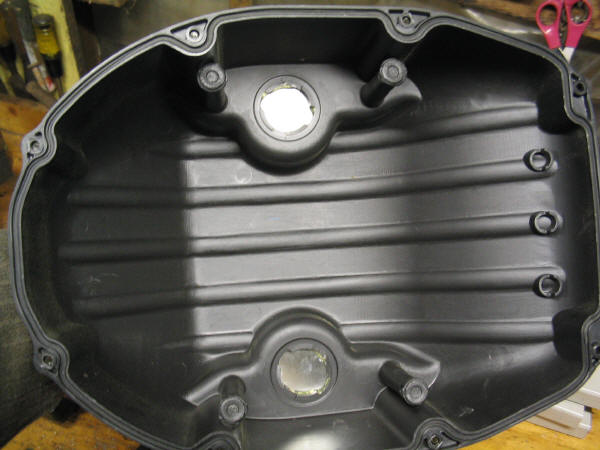
modify as roughly shown in red below:
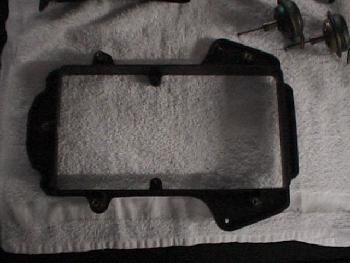
Your base plate should look like this when you are done modding it:
Put everything back and you are done!
Below are the original JoeV instructions -THANKS JOEV!!
Joe
V's Airbox and Base Plate Modifications
Information originally posted
at
http://www.bol.ucla.edu/~gbryant/greg/joev.htm |
|
Hi guys.
As you know, you have requested information on the
modification that I have performed on a number of TLR's. Due
to the number of requests I have chosen to do it via e-mail so
that I don't put up an extremely large post. I would like to
first tell you about these changes. I have tried several ideas
posted by people on the net, I first removed the flappers, and
then I ran with the lib off the air box. What I found was that
when I used either of these ideas, my bike would not make red
line in 6th gear. I was given and idea by Hermit The Dragon
about removing material from the air box. I studied this idea
and thought that it could be improved upon. I know I have been
given credit for this idea by a number of guys who I have
performed this mod for but again, I cannot take the credit. I
only modified an existing idea. I have spoken to a number of
very knowledgeable persons on this subject and can only tell
you what I have been told. I have no dyno available to me so I
cannot support any claims with dyno sheets. The first issue is
ram air. Many will tell you that ram air will only provide
about 2 or 3 hp. I have been told by a friend who is employed
by Yosh that ram air can provide as much a 10%. I also asked a
fellow that was running a dyno at the Canadian Sportbike Rally
last summer, he too stated that ram air can provide as much as
8 to 10% hp. With this in mind, I decided to try and maintain
ram air well allowing the bike to breathe better. By modifying
the air box and maintaining the lid I am easily able to pull
to red line in 6th gear. If this is a result of a 2 or 3 hp
gain I would be amazed. On all of the bikes that I have done
to date, all had the TPS set incorrectly, and all were
re-mapped to +5 +10 +5 with the mixture at 11 o'clock. It is
my personal belief that it is the combination of all of these
factors that has led to the dramatic results. My bike will
power wheelie in 3rd gear and will pull strong to red line in
6th. I am glad that I have read similar result from the people
that I have helped out. This modification does require the
cutting of the base plate inside the air box and is therefore
irreversible without purchasing a new base plate. I will draw
up a set of instruction today and send them out to all that
inquired. I think you will find similar results. A good number
of us have.
Joe |
| |
AIRBOX
I have broken down the air box modification into 2
sections, the lid, and the base plate. Below are listed
the steps to modify the lid:
-
1.)
Remove the air box lid
-
2.)
Turn the lid upside down
-
3.)
You will see the 2 air intake valves. These will be
removed.
-
4.)
Slide the actuator rods out of the flappers (indicated
in lid-1 jpeg)
-
5.)
Turn the lid over and locate the intake air control
valve actuators (indicated in lid-2 jpeg)
-
6.)
Turn the actuators and remove from the air box lid.
-
7.)
Take one of the vacuum lines that run to the actuators
and form a loop to the "t" fitting in the vacuum line.
-
8.)
Now all that is left to do to the lid is to seal the
holes left by the vacuum actuators. On the bike that I
have done, I use fiberglass disks, washers really,
with gasket maker, and place one disk on the inside of
the opening and one disk on the outside of the opening
and secure with a 1/4" bolt and self-locking nut. It
is important to seal these openings.
|
|
|

 |
| |
BASEPLATE
Ok guys here are the directions for the modification
of the base plate. It is very simple to do. You will
require a rotary tool with a cutting bit.
-
1.)
Remove the air filter (illustrated in figure 1)
-
2.)
Remove the base plate by removing the screws
(indicated in figure-2)
-
3.)
Cut away the material outlines in yellow in figures 3
and 4. Be careful not to cut the towers that the
filter bolts to. Also if you turn the base plate up
side down you will see that there is a lip that seals
to the bottom of the base plate, be careful not to cut
this.
-
4.)
Reinstall the base plate and filter. Reinstall the air
box lid. Check the TPS adjustment. Re-map to +5 +10 +5
and you are done. You should now be able to reach red
line in 6th gear.
|
|
|
 
  |
| |
As I
indicated in my first letter, this modification has been done
by others, it is nothing new or exciting. It does however
work! It is my belief that most people underestimate the
effect that ram air has on a bike. Once again, a fellow I know
who is employed by Yosh and the fellow running the dyno at the
sportbike rally, both indicated that ram air can increase hp
by 10%. I tend to believe this as the end result has to be
greater than the 2 or 3 hp claimed by some. Running with the
air box lid off only produces hp in the mid range and detracts
from the top end. This modification along with the re-map
produces healthy increases in the mid range as well as on the
top end. Good luck.
Joe |
|
Okay, I went
through Joe's procedure and took some pictures along the way.
Hope this helps you all understand it even better. I haven't
remapped my bike yet, but plan too. It seems to be running
great without it for now, but I'm sure I could see an
improvement in HP when I do.
Greg
The first step is to remove the airbox lid and take off the
flappers and valve actuators. |
|
  |
| |
|
The next phase is
to plug the actuator holes. I sandwiched the hole in the lid
with two washers, a bolt and locking nut. Also, using some
sealant to ensure it's airtight. |
|
  |
| |
|
The pictures
below show the airbox without the baseplate. As you can see
the holes where the ram air enters are evident. I modified the
baseplate to open these holes up. Joe's instructions are
modifying the baseplate even more and removing the "wings"
remaining on the plate, with the exception of the screw holes.
I don't know there is an obvious benefit to doing this as the
ram air will not enter through there anyway. If you study the
picture, you'll see what I mean. |
|
  |
| |
|
The next set of
pictures show the airbox with the modified baseplate and
filter installed. It also shows you the lid installed again.
Of course the remaining step was to loop the hose at the T
piece. |
|
  |
| |
All information
and images were taken from http://www.bol.ucla.edu/~gbryant/greg/joev.htm
jiffypark.com had no participation in the creation or
write-up of this modification. |
|
|
| |
|
|
|
|
|
|